Tracking website visits is the bedrock of digital strategy. At its simplest, you'll use a web analytics tool like Google Analytics by adding a small snippet of JavaScript tracking code to your site. This code is your data collector, it grabs information about who your visitors are, how they found you, and what they do once they're on your pages.
Why Bother Tracking Website Visitors?
Let's be clear: tracking website visitors isn't about chasing vanity metrics like "hits." It's about gathering real-world intelligence to stop guessing and start making informed decisions. Flying blind with your marketing or product development is a surefire way to waste time and money.
Data tells a story. Knowing you got 10,000 visitors last month feels good, but it's not actionable. The real gold is discovering that 70% of them bounced from your homepage without clicking a single thing. That's an insight you can actually do something with.
The Core Questions: Who, Where, and What
Ultimately, all website tracking boils down to answering three fundamental questions: identifying the user, understanding their origin, and analyzing their on-site behavior. This process turns raw clicks into a strategic asset.
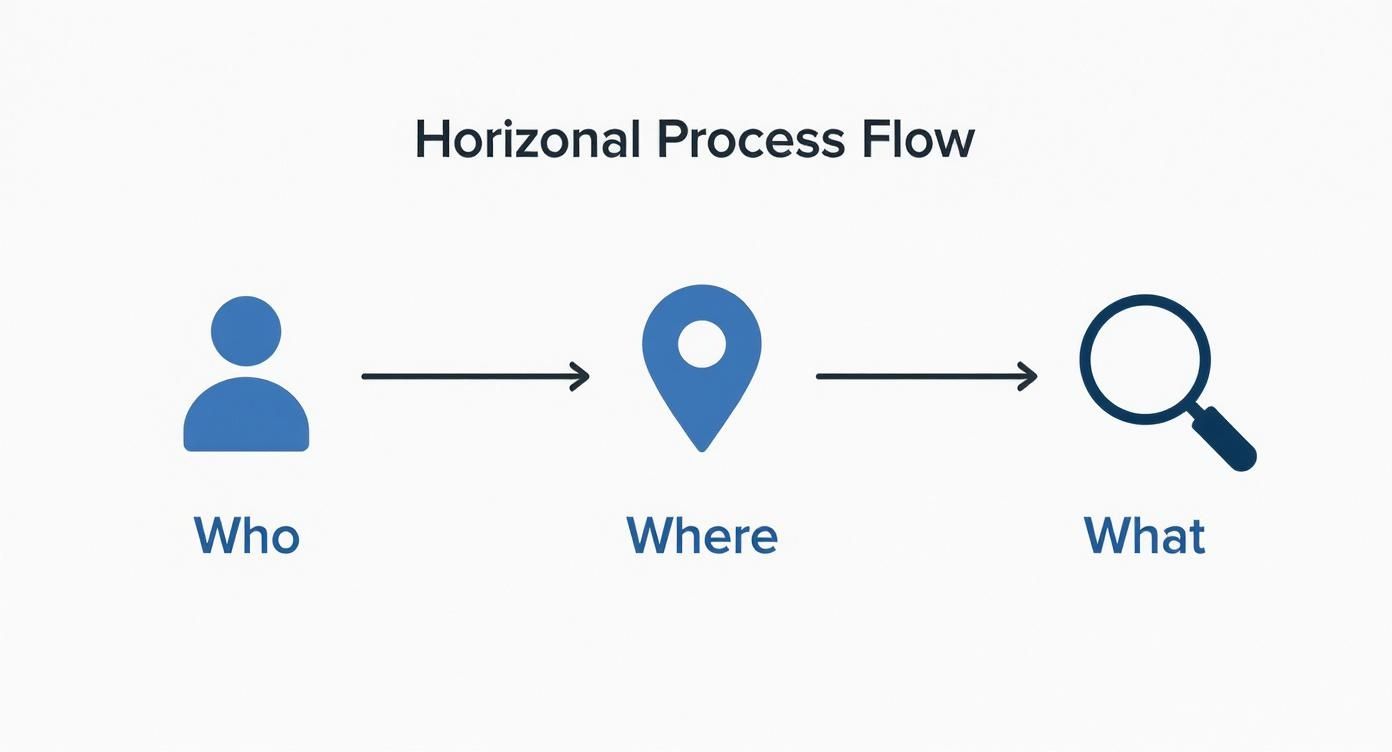
This framework helps you get concrete answers:
- Who is Your Audience? Are they primarily on mobile? Are they visiting from a specific country or city? Knowing their demographics, interests, and the tech they use helps you tailor the experience.
- Where Do They Come From? Is that big SEO push finally paying off, or is a single social media campaign driving all your qualified leads? This tells you which marketing channels are worth doubling down on.
- What Do They Do Here? See which pages get the most attention, how long people stick around, and the exact paths they take through your site. This is how you spot your best content and find pages where users are getting stuck or dropping off.
Key Metrics You Need to Know
When you first open your analytics tool, the wall of data can feel a bit overwhelming. Don't worry, you only need to focus on a few core metrics to get started.
Here’s a quick rundown of the essential terms you'll see on almost any analytics dashboard.
| Metric | What It Measures | Why It Matters |
|---|---|---|
| Users | The total number of unique individuals who visited your site. | Helps you understand the overall size and growth of your audience over time. |
| Sessions | The total number of visits to your site. One user can have multiple sessions. | Shows how frequently people are returning and engaging with your content. |
| Bounce Rate | The percentage of visitors who leave after viewing only one page. | A high bounce rate can signal irrelevant traffic, poor UX, or slow page loads. |
| Session Duration | The average amount of time users spend on your site during a single visit. | A longer duration often indicates that your content is engaging and valuable. |
| Traffic Source | Where your visitors came from (e.g., Organic Search, Social, Direct, Referral). | Tells you which marketing channels are most effective at driving traffic. |
| Conversion Rate | The percentage of visitors who complete a desired action (like a sale or signup). | The ultimate measure of whether your website is achieving its business goals. |
Understanding these metrics is the first step toward pulling meaningful insights from your data and making smarter decisions.
The real magic of analytics isn't just in the numbers themselves, but in the questions they empower you to ask. For example, "Which marketing channel brings in visitors who are most likely to convert into paying customers?"
Drilling down into traffic sources is especially crucial. Industry data often shows that direct traffic (people typing your URL directly) can account for a huge share of visits, sometimes as high as 58%. This highlights the incredible value of building a strong brand that people remember and seek out on their own.
As you get more advanced, you can even explore ways to identify anonymous website visitors to enrich user profiles and create more personalized experiences.
For a deeper dive into the tools and methods available, it's worth exploring different strategies to effectively monitor web traffic. The more you understand how to piece the data together, the clearer the picture of your audience's journey becomes.
Getting Google Analytics 4 Dialed In for Accurate Data
Look, if you want to understand who's visiting your site, Google Analytics 4 (GA4) is pretty much the standard. But getting it set up right from the get-go is absolutely crucial. This isn't just a copy-paste job; it's about laying a clean foundation for every piece of data you'll ever collect.
First things first, you need to create a GA4 property inside your Google Analytics account. Think of this as the dedicated container for your website's data. As you walk through the setup, Google will hand you a unique Measurement ID, which will look something like G-XXXXXXXXXX. This little ID is the critical link between your website and your analytics reports.

With your Measurement ID in hand, the next job is to get the tracking code snippet onto your website. You've got a couple of solid options here, and the right one really depends on your comfort level with code and your long-term plans.
How to Implement the GA4 Tracking Code
Choosing how to install the code is a key decision. A direct implementation is quick and dirty, but using a tag manager gives you way more flexibility down the road.
One of the most common methods is adding the Google tag (gtag.js) directly into your site's HTML. This means dropping the JavaScript snippet Google provides into the <head> section of every single page you want to track. It's a perfectly fine approach for simpler sites where you just need the basic pageview tracking up and running.
If you're on WordPress, you can make your life a lot easier with tools like the MonsterInsights plugin. It handles all the code placement for you, so you don't have to risk breaking your theme by editing files directly.
For a more professional and scalable setup, I almost always recommend using Google Tag Manager (GTM). Instead of adding the GA4 code to your site, you just add the GTM container script once. From there, you manage everything, including your GA4 tag, from the GTM interface. This is a game-changer because it keeps your website's code clean and lets you add other tracking scripts (like a Meta Pixel or LinkedIn Insight Tag) without ever having to bother a developer again.
Think of Google Tag Manager as a toolbox for all your marketing and analytics tags. Instead of leaving tools scattered all over your website's code, you keep them organized in one place, deploying them exactly when and where you need them.
Essential First-Day Configurations
Just getting the code on your site isn't enough. If you want trustworthy data, there are a couple of settings you need to tweak immediately. Skipping these early steps is a recipe for skewed reports and bad business decisions later on.
First up, filter out your internal traffic. Your own team, your developers, and you yourself visiting the website can seriously inflate visitor counts and mess with your engagement metrics.
Here’s how to quickly set up an internal traffic filter:
- Define Your IP Address: Head to the GA4 Admin panel, then
Data Streams>Configure tag settings>Define internal traffic. Here, you can create a rule to label your office's IP address or any IP addresses your remote team uses. - Activate the Filter: Now, go to
Data Settings>Data Filtersand flip the "Internal Traffic" filter to active. This tells GA4 to stop including data from those IPs in your main reports.
It's a small action, but it ensures your reports reflect genuine customer behavior, not your team clicking around.
Another critical setting to change on day one is data retention. By default, GA4 only holds on to user-level data for two months. For most businesses, that's nowhere near enough time to spot long-term trends or do any meaningful year-over-year analysis.
You need to bump this up to the maximum of 14 months. You can find this setting under Admin > Data Settings > Data Retention. Making this change ensures you build a much richer historical dataset to work with as you learn how to track visits to a website effectively. Trust me, these initial tweaks are small but have a massive impact on the quality of your insights.
Using UTM Parameters to Measure Campaign Success
Investing time and money into marketing without a clear way to measure what’s working is like driving blind. You're definitely moving, but who knows if you're even on the right road? This is precisely the problem UTM parameters were designed to solve.
At their core, UTMs are just simple tags you tack onto the end of a URL. But their impact is huge. They tell your analytics platform exactly where a visitor came from, turning vague traffic data into a clear, actionable story about your marketing efforts.
Think of it like this: when someone clicks a link with UTM tags, they arrive at your site holding a note that says, "Hey, I came from the summer sale email, and I clicked the big blue 'Shop Now' button." That level of detail is what ends the guesswork.
This simple process is the foundation of effective marketing attribution. It elevates your analytics from a basic traffic counter into a powerhouse for measuring ROI and making smarter decisions.
Deconstructing the Five UTM Parameters
You have five standard UTM parameters at your disposal. You won't always need every single one, but knowing what each does is key to building a tracking system that actually tells you something useful.
utm_source: Pinpoints the exact platform that sent the traffic, likegoogle,facebook, or yourmonthly-newsletter.utm_medium: Describes the type of marketing channel, such ascpc(for paid ads),social, oremail.utm_campaign: Gives your specific promotion a name, likesummer-sale-2024orq3-webinar-launch.utm_term: Tracks the specific keyword in a paid search campaign that triggered your ad. It's a bit more niche but invaluable for PPC.utm_content: Helps you differentiate between links pointing to the same place. Thinkblue-button-linkversusheader-text-linkin the same email.
When you combine these, you can get incredibly granular. You can finally answer questions like, "Did the link in our email header outperform the one in the footer?" or "Which ad creative on Facebook drove the most signups?" This is the data that separates the good marketers from the great ones.
Building UTMs for Real-World Scenarios
Alright, let's put this into practice. Creating these tagged URLs is pretty straightforward, especially with free tools like Google's Campaign URL Builder. The real challenge? Consistency. A sloppy, inconsistent naming strategy will turn your beautiful analytics reports into a chaotic, unusable mess.
Imagine you're running a paid ad on LinkedIn to promote a new product feature. A properly tagged URL might look like this:
https://yourwebsite.com/new-feature?utm_source=linkedin&utm_medium=cpc&utm_campaign=feature-launch-q3
Just from that link, your analytics will tell you that every visitor who arrived came from a paid ad (cpc) on LinkedIn as part of your Q3 feature launch campaign. Simple and clear.
Now, let's say you're also promoting that same feature in your monthly newsletter. That URL would be different:
https://yourwebsite.com/new-feature?utm_source=newsletter&utm_medium=email&utm_campaign=feature-launch-q3&utm_content=hero-image-link
This link tells a completely different story. The visitor came from your email newsletter, and they specifically clicked on the main hero image.
The real magic of UTMs isn't just knowing where traffic came from; it's about connecting that traffic to actual outcomes. By using a consistent campaign name (
feature-launch-q3) across different sources and mediums, you can easily compare the performance of your LinkedIn ads directly against your email marketing for the exact same initiative.
UTM Parameter Breakdown and Examples
To make this even clearer, here’s a breakdown of how you might structure your UTMs for a fictional online store running a summer sale.
| Parameter | Purpose | Example Usage |
|---|---|---|
utm_source | Where is the traffic coming from? | facebook, google, influencer-collab |
utm_medium | What marketing channel is it? | cpc, organic-social, email, affiliate |
utm_campaign | What specific promotion is this for? | summer-sale-2024, new-product-launch |
utm_term | Which paid keyword did they click? | womens-sandals, beach-towel-sale |
utm_content | Which specific ad or link was clicked? | video-ad-1, main-cta-button, story-link |
A complete URL for a Facebook video ad could look like this: yourstore.com/sale?utm_source=facebook&utm_medium=cpc&utm_campaign=summer-sale-2024&utm_content=video-ad-1. This level of detail makes your campaign reports incredibly powerful.
Establishing a Consistent Naming Convention
If there’s one thing you take away from this, let it be this: consistency is non-negotiable. If one person on your team tags Facebook traffic as facebook and another uses Facebook, your analytics tool sees them as two completely different sources. Your data gets split, and your reports become a nightmare to analyze.
Here are a few simple rules we live by to keep our data clean:
- Always use lowercase. Seriously.
utm_source=googleis not the same asutm_source=Google. Pick one and stick with it. - Use dashes, not spaces. URLs and spaces don't play well together.
summer-saleis clean and readable;summer salecan get messy with encoding. - Keep it simple but descriptive. Anyone on your team should be able to look at the tags and understand the campaign.
q4-ebook-promois infinitely better thanpromo_123.
Document these rules and make sure your whole team follows them. This simple discipline is the secret to accurately tracking your website visits and truly understanding the impact of your marketing.
Tracking Key User Actions with Events and Conversions
Getting people to your website is only half the battle. Raw traffic numbers might look good on a report, but they don't pay the bills. The real magic happens when you understand what users do once they arrive.
This is where tracking specific actions, known as events and conversions, transforms your analytics from a simple traffic counter into a genuine business intelligence tool.
Defining and Tracking Custom Events
Your analytics platform, whether it's Google Analytics 4 or something else, already tracks a few things for you right out of the box. These automatically collected events cover the basics like page views and session starts. GA4 even has enhanced measurement, which can track scrolls, outbound clicks, and file downloads without you lifting a finger.
These are a decent starting point, but they only scratch the surface. The most valuable insights come from tracking the actions that are unique to your business goals. These are the interactions that signal a user is moving down the funnel, getting closer to becoming a customer.
To really get a handle on user behavior, you need to set up custom events.
Think of them as answers to the question, "What do I really want people to do on my website?"
A few common examples I always recommend starting with are:
- Form Submissions: A user signs up for a newsletter or fills out a contact form.
- Button Clicks: Someone clicks the "Request a Demo" or "Add to Cart" button.
- Video Plays: A visitor watches an embedded product tutorial.
- PDF Downloads: A potential lead downloads a whitepaper or case study.
Setting these up requires a bit more hands-on work, but the payoff is enormous. I mean, knowing that 2,000 people clicked your "Request a Demo" button last month is infinitely more useful than knowing you had 50,000 pageviews. That's the kind of data that tells you exactly how well your pages are generating real interest.
Setting Up Your Most Important Events as Conversions
Once you've defined your key events, the next move is to flag the most critical ones as conversions. A conversion is really just an event you've marked as being especially valuable to your business. In GA4, this is as simple as flipping a switch for an existing event in the admin panel.
Marking an event as a conversion isn't just about organizing your reports; it fundamentally changes how you analyze performance. It lets you directly attribute business outcomes, like new leads or sales, to specific traffic sources, campaigns, and user behaviors.
For example, tracking a "newsletter_signup" event is useful. But marking that event as a conversion is how you discover which marketing campaign, social media post, or blog article is actually driving new subscribers. This is how you stop guessing and start optimizing your marketing budget for maximum impact.
And when you're designing the user flow for these critical actions, it's essential to build an effective lead capture form that is both easy to use and optimized for gathering the right information.
This whole shift towards tracking specific actions is also driven by broader trends. Think about the explosive growth of mobile internet traffic. Since early 2009, mobile traffic has shot up from just 0.72% of total global web traffic to an incredible 64.35% today. That's an 8837.5% increase. This just hammers home the importance of tracking actions across all device types, a button click on a phone is just as valuable as one on a desktop.
Implementation Methods: Google Tag Manager vs. GA4 UI
So, how do you actually set this stuff up? You have two main paths: directly in the Google Analytics 4 interface or through Google Tag Manager (GTM).
Here’s my take on when to use which:
-
The GA4 Interface: For simpler events based on things like page views or existing enhanced measurement events, you can create them right inside the GA4 UI. A classic example is creating an event that fires every time someone lands on your
/thank-youpage after a purchase. It's straightforward, but its capabilities are pretty limited. -
Google Tag Manager (GTM): For just about everything else, GTM is the way to go. If you need to track specific interactions like button clicks or form submissions that don't have a unique thank-you page, GTM is your best friend. It gives you incredible, granular control, letting you create triggers based on clicks of specific CSS IDs, form submissions, or pretty much any other user interaction you can imagine.
Honestly, while GTM has a slightly steeper learning curve, it's the professional standard for a reason. Learning to use it is a non-negotiable skill for anyone serious about getting their tracking right.
Turning Your Data Into Actionable Insights
Collecting data is just step one. The real magic happens when you turn those raw numbers into smarter decisions. Once your tracking is humming along, the next challenge is to find the stories hidden inside your analytics reports. This is how you stop asking “how many visits did we get?” and start understanding “why did those visits matter?”
Think of your analytics dashboard as a control room. Every report is a different screen showing you a vital part of your operation. Knowing which screens to watch, and what the flashing lights mean, is the key to steering your strategy in the right direction.
Navigating Key GA4 Reports
Jumping into Google Analytics 4 for the first time can feel like a lot. Let’s cut through the noise and focus on a couple of the most powerful reports to get you started on the right foot. These are your go-to sources for understanding traffic and user behavior.
Your first stop should always be the Traffic Acquisition report. This answers the most fundamental question: "Where are my visitors coming from?" It breaks down traffic by default channel groupings like Organic Search, Direct, Paid Social, and Referral. This is where you see the direct results of your marketing campaigns.
For instance, you might see that your Organic Search traffic is sky-high, but the engagement rate is disappointingly low. That’s a huge clue. It could mean that while your SEO is doing its job getting you ranked, the content on your landing pages isn't living up to the promise. That's a critical insight you can act on immediately.
Next, you'll want to dive into the Engagement reports, specifically the Pages and screens report. This tells you exactly which pages on your site are getting the most attention. It's a goldmine for spotting your most popular blog posts, your highest-performing landing pages, and, just as importantly, the pages that are causing people to leave.
Uncovering Deeper Insights with Filters and Comparisons
Looking at top-level numbers is fine, but the real power of analytics comes from slicing up your data to see how different groups of users behave. This is where filters and comparisons become your best friends.
Let's say your overall engagement rate is 60%. On its own, that number is pretty useless. But what happens when you create a comparison between traffic from "Organic Search" and "Paid Social"?
You might discover something like this:
- Organic Search visitors have a 75% engagement rate and spend way more time on your blog.
- Paid Social visitors only have a 45% engagement rate, but they convert at a much higher rate on a specific product page.
This simple comparison just handed you a massive strategic insight. Your SEO and content marketing are fantastic for building an engaged audience, but your paid social ads are better at driving immediate action. Now you can fine-tune your strategy for each channel instead of using a one-size-fits-all approach.
You can apply this same logic to almost any dimension you can think of. Compare mobile users to desktop users, visitors from the USA to visitors from Germany, or new users to returning users. Each comparison peels back another layer of the onion, revealing a deeper truth about your audience.
Asking the Right Questions of Your Data
The best data analysis always starts with good questions. Instead of just passively scrolling through reports, you need to actively interrogate your data.
Here are a few practical questions to guide your exploration:
- Which blog posts are creating the most engaged readers? Head to your Pages and screens report, sort by "Average engagement time," and see which topics truly hook your audience. This tells you exactly what kind of content to create more of.
- Which landing pages are leaking visitors? Find pages with high view counts but suspiciously low engagement rates or high exit rates. These are your leaky buckets, pages that probably need UX improvements, clearer messaging, or a much stronger call-to-action.
- What path do converting users actually take? Use the Path Exploration report in GA4 to trace the steps users take right before they complete a key action, like making a purchase or filling out a form. You might discover an unexpected blog post or an old landing page that plays a huge role in the customer journey.
Answering these questions turns your data from a simple historical record into a powerful predictive tool. It helps you anticipate what your users need and proactively improve their experience on your site. This is especially vital when you consider the sheer scale of modern web traffic. For example, Google.com alone gets around 98.2 billion monthly visits, a number that shows just how often users return to sites they find valuable. You can read more about the most visited websites worldwide on ExplodingTopics.com.
By digging into your analytics, you're really just finding the patterns that reveal what your users truly want. For B2B companies, this gets even more powerful when you combine it with other data sources. Learning how B2B data enrichment strategies can help you build a fuller picture of your most valuable customers is a great next step. Ultimately, this analytical process is the final, most important piece of the puzzle in learning how to track visits to a website.
Common Questions About Website Tracking
As you start digging into website tracking, you're bound to run into a few questions. Let's clear up some of the most common ones I hear so you can move forward with confidence.
Can I Track Website Visits Without Google Analytics?
Absolutely. While Google Analytics is the 800-pound gorilla in the room, it's far from your only option. A whole ecosystem of great alternatives has popped up, especially for businesses that care deeply about user privacy and simplicity.
Platforms like Matomo, Fathom Analytics, and Plausible Analytics offer really solid tracking, often without relying on cookies. This is a huge win if you're navigating strict privacy laws like GDPR. The cool thing about a tool like Matomo is that you can self-host it, which gives you 100% data ownership and total control over how that information gets stored and used.
How Can I Be Sure My Website Tracking Is Accurate?
Making sure your data is trustworthy comes down to a few practical checks. I always start with a browser extension like Google's Tag Assistant. It's your first line of defense, fire it up and make sure your tracking tags are actually firing on all your important pages. Simple, but you'd be surprised how often something is missed.
Next, you have to set up IP filters in your analytics tool. This is non-negotiable. You need to exclude traffic from your own company, your developers, and any remote team members, because that internal traffic can seriously skew your numbers.
Finally, get in the habit of cross-referencing your analytics data with other sources. I'll often compare it against server logs or, for an e-commerce site, the sales figures from the platform itself. Small differences are totally normal, but this sanity check helps you spot any major, glaring discrepancies early on.
What Is the Difference Between Client-Side and Server-Side Tracking?
This is a big one, and it trips a lot of people up.
Client-side tracking is what most of us are used to. A little snippet of JavaScript runs in the user's browser, collects data, and sends it straight to an analytics server. It's pretty easy to set up, but its big weakness is that it can be blocked by ad blockers and increasingly strict browser privacy settings. This isn't a small problem anymore, it affects a significant chunk of web traffic.
Server-side tracking is the more robust, modern alternative. It collects data directly from your web server before it ever gets sent to the analytics tool. Because it all happens on the server, it’s completely invisible to ad blockers, making your data much more accurate and reliable. The trade-off? It’s more technically complex to implement and might not capture certain browser-specific interactions as easily.
Why Is My Bounce Rate So High in My Analytics?
If you're using Google Analytics 4, you've probably noticed that the classic "bounce rate" is gone. It's been replaced by its opposite: "engagement rate." So, a low engagement rate is the new high bounce rate, and it tells you that users are hitting a single page and leaving without interacting.
When I see low engagement, there are a few usual suspects I check first:
- Slow Page Load Times: If a page takes forever to load, people are gone before they even see it.
- Misleading Content: Your page title and meta description might be writing checks your content can't cash.
- Poor User Experience: A confusing layout, especially on mobile, is a surefire way to frustrate users into leaving.
- Mismatched Intent: The traffic source could be sending you visitors who are looking for something completely different than what your page offers.
The fix is to dive into the specific pages with low engagement and look at where the traffic is coming from. Nine times out of ten, improving the content relevance and smoothing out the user experience is the most effective way to get that engagement rate up.
Ready to create a more personalized experience for every visitor you track? Brand.dev is the Internet’s Brand API, allowing you to instantly enrich your product with company logos, colors, and complete style guides from any domain. Stop asking users for their brand assets and start delivering on-brand experiences from the moment they sign up.